Another amazing idea found on Pinterest! I did mine much simpler than what I found there though.
These are made the same way you would make a tutu with tulle fabric. A bunch of "knots."
I took all my scraps and cut them into strips as long as possible about 1-2 inches wide.
Take a piece of elastic and sew it to fit around whoever you are making it for (or you can use elastic headbands). The elastic will stretch as you are tying the knots onto it so measure your model and then subtract 2-3 inches before sewing the elastic together.
Take the strips of fabric, fold in half and "knot" them around the elastic band. (if you do not know how to do tutu knots look up a video on YouTube, it is much easier to follow a video demo then a written or pictured one). Continue to knot your fabric strips around the entire elastic band.
That's all their is to it! Cute, unique, and fun for the little princess in your life :)
Wednesday, January 18, 2012
Monday, January 2, 2012
Epsom Salt Candle Vase
This is the end of our crafty night. The Prince was insisted on using the epsom salt now instead of later. So we did a project that is all over pinterest right now.
You'll need
*Glass vase for candle
*Epsom salt
*Mod podge
*Sponge brush
Cover the outside of the candle vase in mod podge. The Prince loved this part. He wanted me to hold it so he didn't get his hands messy though. :)
Then roll the vase in the Epsom salt. We used white to make it look "frosty" for winter. Let it dry completely.
Be sure the candle vase is completely empty of epsom salt on the inside and then put the candle in, light it, and enjoy!
You'll need
*Glass vase for candle
*Epsom salt
*Mod podge
*Sponge brush
Cover the outside of the candle vase in mod podge. The Prince loved this part. He wanted me to hold it so he didn't get his hands messy though. :)
Then roll the vase in the Epsom salt. We used white to make it look "frosty" for winter. Let it dry completely.
Be sure the candle vase is completely empty of epsom salt on the inside and then put the candle in, light it, and enjoy!
Tile Coasters
Homemade coasters are super cute and easy to make. These tutorials are all over the internet, but I thought I would share what worked for me.
What you'll need...
*4.25x4.25 tiles-these are 16 cents at Home Depot
*White paint
*Paint brush or sponge paint brush
*Mod podge
*Krylon matte finish
*Cork
*Tacky glue
*Scrapbook paper
*Scissors
First Paint the edges of the tiles you are using white to match the top.
Next take the scrapbook paper and cut or punch out 4x4 squares. I used my cricut, but these would be easy enough to cut with scissors.
Then apply a thin and even layer of mod podge on the top of the tile and adhere the scrapbook paper square to the tile. Press the scrapbook paper down and be sure to smooth it out so that the paper does not bubble or crease. This should dry within a couple of minutes.
Once the paper is dried onto the tile, apply an even layer of mod podge over the top of the scrapbook paper on the tile, be sure to cover the entire tile evenly. Let the mod podge dry and then apply a second even layer. I let the tiles dry for a few hours to be sure they are completely dry before continuing.
Next take the tiles outside and spray on the Krylon matte finish. Let it dry for 15 minutes and spray on a second layer. Then let them dry overnight. (If the tiles do not have enough time to dry when things are placed on them they will leave marks in the finish.)
Cut out 4x4 squares from the cork, check to see the fit on the bottom of the tile to get it even. Use the tacky glue to adhere the cork to the tile and let it dry. I placed the tiles with freshly glued on cork underneath something flat and heavy (school book) so that the cork would dry as close as possible to the tile. I also let these dry overnight just to ensure the quality.
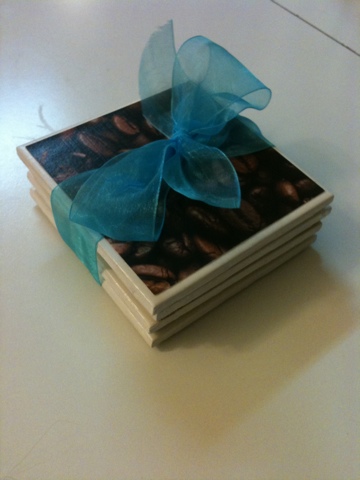
Your tiles are finished! These make great affordable presents and are cute to have around the house. We have popcorn ones and wine glasss ones for our house, coffee bean ones for Memaw's house, and strawberry ones for Great Grandma and Grandpa's.
What you'll need...*4.25x4.25 tiles-these are 16 cents at Home Depot
*White paint
*Paint brush or sponge paint brush
*Mod podge
*Krylon matte finish
*Cork
*Tacky glue
*Scrapbook paper
*Scissors
First Paint the edges of the tiles you are using white to match the top.
Next take the scrapbook paper and cut or punch out 4x4 squares. I used my cricut, but these would be easy enough to cut with scissors.
Then apply a thin and even layer of mod podge on the top of the tile and adhere the scrapbook paper square to the tile. Press the scrapbook paper down and be sure to smooth it out so that the paper does not bubble or crease. This should dry within a couple of minutes.
Once the paper is dried onto the tile, apply an even layer of mod podge over the top of the scrapbook paper on the tile, be sure to cover the entire tile evenly. Let the mod podge dry and then apply a second even layer. I let the tiles dry for a few hours to be sure they are completely dry before continuing.
Next take the tiles outside and spray on the Krylon matte finish. Let it dry for 15 minutes and spray on a second layer. Then let them dry overnight. (If the tiles do not have enough time to dry when things are placed on them they will leave marks in the finish.)
Cut out 4x4 squares from the cork, check to see the fit on the bottom of the tile to get it even. Use the tacky glue to adhere the cork to the tile and let it dry. I placed the tiles with freshly glued on cork underneath something flat and heavy (school book) so that the cork would dry as close as possible to the tile. I also let these dry overnight just to ensure the quality.
Your tiles are finished! These make great affordable presents and are cute to have around the house. We have popcorn ones and wine glasss ones for our house, coffee bean ones for Memaw's house, and strawberry ones for Great Grandma and Grandpa's.
Coloring Espom Salt
Epsom salt can be used for sensory purposes, crafts, a substitute for glitter (so much easier to clean up!) and decorations. The Prince and I colored Epsom salt today so we can use it for future projects. It is very easy to do and the colors look great! I was browsing the internet and found some cute project ideas on ehow.com that used colored epsom salt and thought I would share.
You'll need....
Epsom salt (6lb bag for 4.97 at Walmart)
Food color
Container with lid (1 for each color)
The prince put in 2 cups of epsom salt into a container.
Next I let him squirt in around 6 drops of food coloring. On ehow.com it said to use one drop to color one cup, but I found that we needed more to get the color we wanted.
Then I made sure the lid was on tight and he shook it all up until all the salt was colored evenly.
We did colors red, blue, green, purple, pink, yellow, orange (mixed yellow and red), and left some plain. I'll be posting projects using epsom salt as I create them or come across something I just have to try :)
You'll need....
Epsom salt (6lb bag for 4.97 at Walmart)
Food color
Container with lid (1 for each color)
The prince put in 2 cups of epsom salt into a container.
Next I let him squirt in around 6 drops of food coloring. On ehow.com it said to use one drop to color one cup, but I found that we needed more to get the color we wanted.
Then I made sure the lid was on tight and he shook it all up until all the salt was colored evenly.
We did colors red, blue, green, purple, pink, yellow, orange (mixed yellow and red), and left some plain. I'll be posting projects using epsom salt as I create them or come across something I just have to try :)
Wednesday, December 28, 2011
New Years Fireworks
I was searching for a fun new years idea for my toddlers at work and found this fun little craft from nickjr.com.
What you need:
*Colored pipe cleaners-2 for each firework
*Glue
*Glitter
*String
First cut all pipe cleaners in half.
Then twist 2 like colors together at the center. They will form an + shape.
Next take two +'s of different colors and twist those together. Bend down the ends of the pipe cleaners to look like a firework burst.
Put glue on the ends (with the toddlers I had them use a paintbrush, older kids may be able to just use a glue bottle)
Pour or dip the glue ends in glitter (I used silver but any color can be used)
Then cut a string to your desired length and tie it to the center of each firework.
Hang it wherever you would like! They look cute in windows or would be cute hanging from the ceiling as well!
What you need:
*Colored pipe cleaners-2 for each firework
*Glue
*Glitter
*String
First cut all pipe cleaners in half.
Then twist 2 like colors together at the center. They will form an + shape.
Next take two +'s of different colors and twist those together. Bend down the ends of the pipe cleaners to look like a firework burst.
Put glue on the ends (with the toddlers I had them use a paintbrush, older kids may be able to just use a glue bottle)
Pour or dip the glue ends in glitter (I used silver but any color can be used)
Then cut a string to your desired length and tie it to the center of each firework.
Hang it wherever you would like! They look cute in windows or would be cute hanging from the ceiling as well!
Tuesday, December 20, 2011
Christmas Ornament
This was quick and fun! I saw one like this on pinterest and had to try it with The Prince.
You need:
Green pipe cleaners
Transparent pony beads
String
Bend the pipe cleaner to look like a tree (see pic for reference). Then simply slide the beads on for the tree "lights". Tie string to the top of the "tree" and then tie a loop so you can hang it up in the window or on the tree!
You need:
Green pipe cleaners
Transparent pony beads
String
Bend the pipe cleaner to look like a tree (see pic for reference). Then simply slide the beads on for the tree "lights". Tie string to the top of the "tree" and then tie a loop so you can hang it up in the window or on the tree!
Saturday, December 10, 2011
Water Marbles
Inspired by a picture from Play At Home Mom, I decided to make a sensory tub with water marbles. I went to the dollar store and bought 4 cans of decorative water marbles (non-toxic) and a big food storage container. The water marbles were clear which was okay, but I decided I wanted to dye on of the cans blue to give it more of an ocean/lake look.
I first dumped the one can onto paper towels and let them dry out a little so they could absorb the color later.
After drying out I put half of them back in the container and put one drop of blue food coloring in. Then put the rest in and put one more drop of food coloring on top. I closed the lid and shook it up.
Then I filled the container with water, shook it up, drained it, filled with water, shook it, drained it...etc. Until the water draining out was only slightly blue (didn't want the kids hands dyed blue from too much color!)
Then I added the blue water marbles with the clear. When mixed together they almost all looked blue. I put in a couple small containers with lids and scoops for The Prince to play with.
Both my little ones loved this! I love that it is a small enough container to bring with places (like Memaw's & Papa's) but big enough to play in. This sensory play tool is awesome (I love to play with this with the kids too) and you can't go wrong for a total of $5!
Subscribe to:
Posts (Atom)